All players of one server jump into a shared map to attack a central boss. When the event opens each day at the following times, you can enter the “Treacherous Domain” map on x-1 and x-8 maps. There is no level limit and the entry is free.
Each day, the gate opens at:
| 09:00 – 09:30 | 11:00 – 11:30 | 16:00 – 16:30 | 19:00 – 19:30 | 20:00 – 20:30 | 22:00 – 22:30 |
- The boss will spawn 5 minutes after the gate opens and will remain on the map for 20 minutes after spawning. The gate will close 5 minutes after the boss is defeated or despawns.
- During the event, there’s always a portal in the event map that can return to the base. You can enter and exit at any time.
- All players jump into a shared map to attack a central boss. You play in a dedicated PvE environment where PvP interactions are prohibited. /li>
- All damage dealt by players to the boss in the server will be aggregated into the server-wide damage tally. Once the tally meets the requirements of the current tier progression, the corresponding tier-based rewards will be distributed to players. The tier level will then advance, and the damage tally will reset to begin accumulating a new.
- In each battle, once the boss has sustained a predefined damage threshold, players currently in the event map will receive corresponding rewards. Players can obtain rewards for each damage tier up to three times per day.
- The damage dealt by each player is recorded and ranked. At the end of each battle, players that contributed the most will get additional rewards.
- The health of the Boss changes dynamically based on the number of players currently participating in the battle. When new players join the battle, the maximum health of the Boss will increase accordingly. If players leave, the health of the Boss will also decrease.
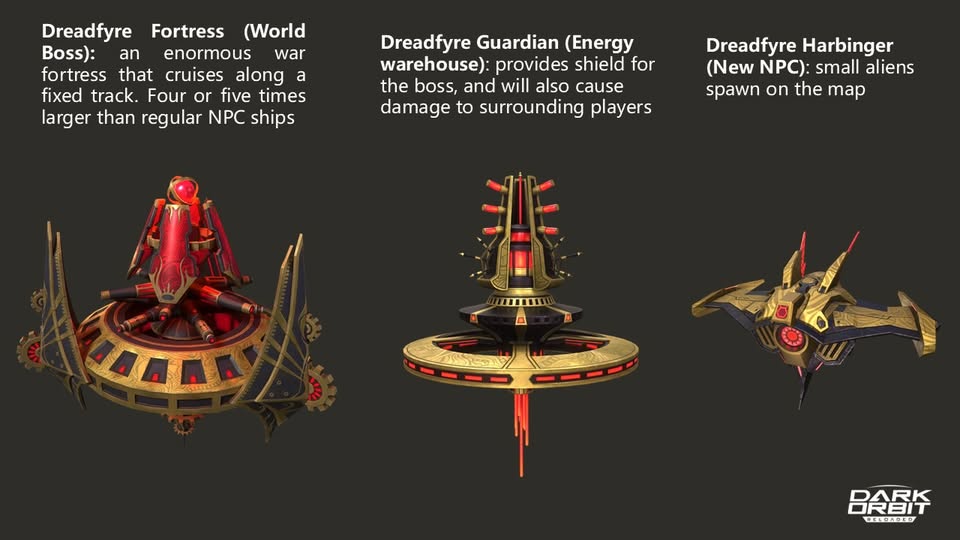
- Dreadfyre Guardian and Dreadfyre Fortress: The kill will only count for the player who destroyed them, not for all players in the map.
It is summoned by the Dreadfyre Guardian. It targets the player who deals most damage to the Dreadfyre Guardian.
There are 4 Phases:
- Phase 1:
- The Dreadfyre Guardian remains stationary, continuously emitting a damaging magnetic field centered on itself.
- Upon its first receipt of damage, it summons the Dreadfyre Harbingers.
- When its health drops to 1 (the health of Dreadfyre Guardian will not go below 1 in the first 3 phases), it enters a downed state and becomes invulnerable. You should cease attacking the Guardian at this stage.
- Once all four Dreadfyre Guardians enter the downed state, the battle proceeds to Phase 2.
- Phase 2:
- Every 30 seconds, a randomly chosen Dreadfyre Guardian in the downed state will be reactivated and restored to full health.
- Each activated Guardian grants the Dreadfyre Fortress a stacking 25% damage reduction shield.
- If an activated Guardian does not return to the downed state within 20 seconds, it launches a seeker rocket at the 10 closest targets within range.
- Phase 3:
- Every 30 seconds, 2 random Dreadfyre Guardians are immediately deployed.
- Each activated Guardian grants the Dreadfyre Fortress a stacking 25% damage reduction shield.
- If an activated Guardian does not return to the downed state within 20 seconds, it launches a seeker rocket at the 10 closest targets within range.
- Phase 4:
- All 4 Dreadfyre Guardians are reactivated at the same time and restored to full health.
- Each activated Guardian grants the Dreadfyre Fortress a stacking 25% damage reduction shield.
- If an activated Guardian does not return to the downed state within 20 seconds, it launches a seeker rocket at the 10 closest targets within range.
- When a Dreadfyre Guardian’s health reaches 0, it is instantly destroyed and cannot respawn.
- Phase 0:
- In the first 5 minutes after the Event map becomes available the preparation phase starts and Dreadfyre Harbingers will spawn on the map.
- Defeating these NPCs will grant a chance to drop gift boxes.
- Collecting these gift boxes provides a chance-based acquisition of various beneficial buffs for HP, Speed, Shield, Heal.
- Phase 1:
- The Dreadfyre Fortress is invulnerable in phase 1
- It moves along a circular trajectory throughout all phases without stopping.
- It relentlessly locks onto the closest target and dealing damage to all targets in its path.
- Phase 2:
- The Dreadfyre Fortress removes its invulnerability.
- It launches rockets at the 4 players within attack range dealing the highest damage to itself.
- Every 20 seconds, it unleashes a wide-area, high-damage radiation burst.
- When its health drops to 80%, it summons a ring-shaped minefield around itself.
- When its health drops to 50%, the battle enters Phase 3.
- Phase 3:
- Dreadfyre Fortress will continue launching rockets and deploying ionizing radiation attacks.
- Every 10 seconds, the Fortress releases a map-spanning laser beam.
- When its health drops to 50% and 30%, it respectively summons a ring-shaped minefield around itself.
- When its health drops to 10%, the battle enters Phase 4.
- Phase 4:
- When its health drops to 10%, it summons a ring-shaped minefield around itself.
- The Dreadfyre Fortress ceases to fire its map-spanning lasers but reduces the interval between radiation bursts to every 10 seconds.


AMMUNITION:
During the event, the following laser/rocket ammunition deals extra damage to the following mission NPCs:
UCB-100 – Deals x6 instead of the usual x4 to: Dreadfyre Fortress, Dreadfyre Guardian, Dreadfyre Harbinger
RSB-75 – Deals x7 instead of the usual x6 to: Dreadfyre Fortress, Dreadfyre Guardian, Dreadfyre Harbinger
PLT-2021 – Deals 7.500 Damage instead of the usual 4,000 Damage to: Dreadfyre Fortress, Dreadfyre Guardian, Dreadfyre Harbinger
The Server Progress records the total damage of battles during the event. When the progress reaches a certain value, a reward will be given to all server players.
- There are 20 reward levels for damage progress.
- After reaching a level of progress, the next level will start accumulating the damage value from 0 again.
- After reaching the highest level of progress (100%), the damage progress will no longer continue to accumulate.
| RANKING | REWARD | RANKING | REWARD | |||
| 1 | 250x |
1.000  |
11 | 2.750x |
3.500 |
|
| 2 | 500x |
1.000x UCB-100 |
12 | 3.000x |
5x IAC |
|
| 3 | 750x |
1.500 |
13 | 3.250x |
4.000 |
|
| 4 | 1.000x |
2.000x UCB-100 |
14 | 3.500x |
8x IAC |
|
| 5 | 1.250x |
Erythros Drone Design | 15 | 3.750x |
Erythros Drone Design | |
| 6 | 1.500x |
2.000 |
16 | 4.000x |
4.500 |
|
| 7 | 1.750x |
20x ABR |
17 | 4.250x |
5x I-Oil |
|
| 8 | 2.000x |
2.500 |
18 | 4.500x |
5.000 |
|
| 9 | 2.250x |
30x ABR |
19 | 4.750x |
8x I-Oil |
|
| 10 | 2.500x |
Erythros Drone Design | 20 | 5.000x |
Xanthos Drone Design Title: Dreadfyre Fortress 2026 |
|
The Battle Participation Rewards records the damage of all players in a single boss fight, and the damage value accumulates to unlock the participation rewards.
- Regardless of whether the Boss is killed or not, the rewards will be issued according to the current progress.
- The event progress is divided into 5 stages.
- The rewards will get better and better as the amount of damage increases.
- There is a daily upper limit for this reward.
The rewards are issued in real time, requiring players to be in the event map. Players who enter the gate in the later stage will no longer receive rewards that have already been issued. If you leave midway and no longer enter, subsequent rewards will not to be issued to you.
There will not be any additional portal rewards like cargo box other NPCs drop.
| TIER | 1 | 2 | 3 | 4 | 5 |
| DAMAGE | 227.000.000 | 567.500.000 | 1.135.500.000 | 1.702.500.000 | 2.270.000.000 |
| REWARD | 100 50x 5x |
200 100x 5x |
300 150x 8x |
400 200x 10x |
500 300x 10x |
The player and teammates who kill the boss will receive the Final Blow Reward:
| Title: Spirefall | 777x |
777x |
777x UCB-100 |
BATTLE RANKING REWARDS
These rewards will be given to the Top 100 ranking players that contributed the most damage to the World boss during a single boss fight.
| RANK: | 1 | 2 | 3 | 4-5 |
| REWARD: |
|
|
|
|
| RANK: | 6-10 | 11-25 | 26-50 | 51-100 |
| REWARD: |
|
|
|
|